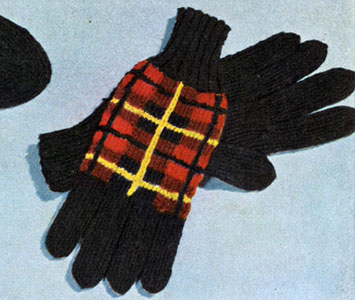
Wallace Tartan Gloves Pattern

MATERIALS:
Chadwick's Red Heart Sock and Sweater Yarn, 3 Ply, Art. E.255, Shrink and Stretch Resist, 2 skeins (1 oz. pull-out skeins) of Black and 1 skein each of Scarlet and Dark Red for all sizes. A few yards of Yellow.
Milwards “Phantom” Aluminum or Clark's O.N.T. Plastic Knitting Pins, 1 pair No. 1 (2½ mm. size) and 1 pair No. 2 (2¾ mm. size).
Milwards “Phantom” Aluminum or Clark's O.N.T. Plastic Double-pointed Sock Needles, 1 set No. 2 (2¾ mm. size).
Bobbins.
GAUGE: 7½ sts make 1 inch; 10 rows make 1 inch.
| Sizes | Small |
Med |
Large |
| RIGHT GLOVE ... Starting at cuff with Black and No. 1 knitting pins, cast on 52 sts. Work in ribbing of k 2, p 2 for 2½ inches, increasing 2 sts on last row. Break off. | |||
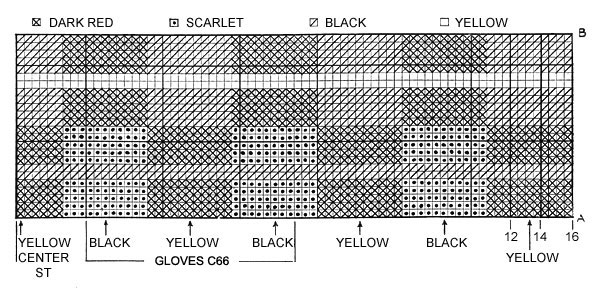
| NOTE: Vertical stripes are omitted on chart, to be worked later. When changing from one color to another always twist the unused color around the other to prevent making holes. | |||
| Change to No. 2 knitting pins and work in pattern as follows: 1st row: Attach a bobbin of Scarlet, k 2, p 1, k 5, drop Scarlet, attach a bobbin of Dark Red, with Dark Red k 5, p 1, k 5, drop Dark Red, attach a bobbin of Scarlet, with Scarlet k 5, p 1, k 2, drop Scarlet, attach a bobbin of Black, with Black, k 2, place a marker, inc 1 st in each of next 2 sts, place a marker, k to end of row. 2nd row: With Black p across to first marker, slip marker, p 4, slip marker, p 2, drop Black, with Scarlet, p 2, k 1, p 5, drop Scarlet, with Dark Red p 5, k 1, p 5, drop Dark Red, with Scarlet p 5, k 1, p 2. Starting with the 3rd row follow chart for Gloves (see page 7), over the first 27 sts, working the knit and purl sts as established until top of chart is reached. Then repeat chart from beginning | |||
At the Same Time |
|||
| with Black, work remaining sts in stockinette st (k 1 row, p 1 row), increasing 1 st in first and last sts between markers every knit row, until there are 10 sts between markers. Continue in pattern as before, increasing 1 st in first and last sts between markers every 4th row, until there are 18 sts between markers, ending with wrong side facing. Next row: Work in pattern across first 27 sts. With Black k 2, slip next 18 sts onto a safety pin to be worked later for Thumb. Cast on 2 sts and knit to end of row. Continue in pattern as before until 48 rows in all of chart pattern have been completed, ending with wrong side facing. Break off all colors | |||
| LITTLE FINGER ... With Black and double-pointed needles, k 7, slip next 41 sts onto a strand of yarn, cast on 2 sts and k remaining 6 sts. Divide these 15 sts onto 3 needles, join and knit around until finger measures | 2¼” |
2½” |
2¾” |
| or ¼ inch from tip. | |||
| To Shape Tip: 1st rnd: * K 1, k 2 tog. Repeat from * around. 2nd rnd: K around. 3rd rnd: * K 2 tog. Repeat from * around. Break off, leaving a 6-inch length of yarn. Thread this yarn through a needle and draw through remaining sts, pull up tightly and fasten off securely on wrong side. | |||
| RING FINGER ... Slip 6 sts from each end of yarn onto double-pointed needles, attach Black to st at end of front, pick up and k 2 sts over the cast-on sts of Little Finger, k across the 6 sts of back, cast on 2 sts between palm and back of hand. Divide sts on 3 needles and work as for Little Finger until finger measures | 2½” |
2¾” |
3” |
| or ¼ inch from tip. Complete as for Little Finger. | |||
| MIDDLE FINGER ... Slip 7 sts from each end of yarn onto double-pointed needles, attach Black to st at end of front, pick up and k 2 sts over the cast-on sts of Ring Finger, k across the 7 sts of back, cast on 2 sts. Divide sts on 3 needles and work as for Little Finger until finger measures | 2¾” |
3” |
3¼” |
| or ¼ inch from tip. Complete as for Little Finger. | |||
| INDEX FINGER ... Slip remaining 15 sts onto double-pointed needles, attach Black to st at end of front, pick up and k 2 sts over the cast-on sts of Middle Finger. Work as for Ring Finger. | |||
| THUMB … Slip sts from safety pin onto double-pointed needles, attach Black to last st at front, pick up and k 2 sts over the cast-on sts. Work as for Little Finger until Thumb measures | 2” |
2¼” |
2½” |
| or ¼ inch from tip. Complete as for Little Finger. | |||
| VERTICAL STRIPES ... With crochet hook and colors indicated by arrows on chart, make a row of chain st in each of the purl rib sts. | |||
| Sew up side seam. Fasten all ends securely on wrong side. Press lightly. | |||
| LEFT GLOVE ... Work as for Right Glove until ribbing is completed. Next row: Attach a bobbin of Black, with Black k 23, place a marker, inc 1 st in each of next 2 sts, place a marker, k 2. Work in pattern over remaining 27 sts. Position of Thumb is now established. Work as for Right Glove. | |||

Cardigan Pattern
Barclay Tartan Pullover Pattern
Elliot Tartan Cardigan Pattern
Checkerboard Stole Pattern
Duncan Tartan Weskit Pattern
Wallace Tartan Pullover Pattern
Shepherd Tartan Cardigan Pattern
Elliot Tartan Scarf Pattern
Hamilton Tartan Vest Pattern
Wallace Tartan Gloves Pattern
Barclay Tartan Socks Pattern
MacPhee Tartan Belt Pattern
| Pattern Categories Browse the categories to help you find the patterns you're looking for. |
||
|
||


