Newly Added Knit Patterns
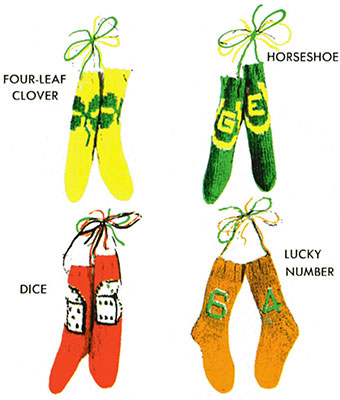
Miniature Socks Pattern #2402

Simplified multi-color knitting with color charts. Stitch sequences numbered. Each row knitted across and purled back in the same colors.
IMPORTANT
Knit across and purl back each row before starting next row. For a miniature sock approximately 4½ inches long, with ½ inch ribbing, your knitting tension should be tight enough to produce about 10 or 10½ stitches per inch using size #1 or zero needles. If you do not obtain this gauge, change to larger or smaller needles as your particular knitting tension requires. If you wish your miniature socks to be real tiny (under 4 inches long) knit on smallest possible needles or toothpicks and obtain 11 stitches per inch. In this case you may wish to make plain part of foot quite short, and with perhaps only ¼ inch of ribbing for the cuff. Use your own choice of yarn colors. See detailed instructions on reverse side.
WEAR AS A CHARM or HANG IN YOUR (OR HIS) CAR SIZE APPROX. 4½” LONG
NOTES
1. ALL DESIGNS—In choosing yarn be sure colors selected are in good contrast to show the design in sharp detail. Since these socks are ornamental, it is suggested that use be made of brighter basic colors such as RED, YELLOW, ROYAL BLUE, WHITE, etc. You may wish to knit in colors to match your car interior.
2. FOUR-LEAF CLOVER SOCKS. Use a green 4- Leaf clover against a contrasting background such as RED, WHITE, BROWN, etc. The clover itself can of course be knit in some other color besides the classic green. It could be BROWN, YELLOW or most any color you wish without detracting from the 4-Leaf Clover symbol.
3. HORSESHOE SOCKS. Use bright contrasting colors as mentioned above. Your choice of initial may be inserted in the blank space within the horseshoe if you wish, and you may prefer to knit this initial in a third color.
FOR NAIL HOLES in the horseshoe, embroider French knots, using dark-colored embroidery floss.
Note that an interesting pair of socks may be formed by using one 4-Leaf Clover sock and one Horseshoe sock (to utilize both of these lucky symbols). Colors can be blended by making the background color of one sock the design color of the other, and vice versa.
4. DICE SOCKS. Knit the die on each sock in WHITE or a pastel color with a dark color outline, to show the cubic shape. Background should then be in a bright contrasting color such as vivid RED, bright BLUE, GREEN, ORANGE, or etc. Spots on each die should similarly be of a prominent color to show distinctly.
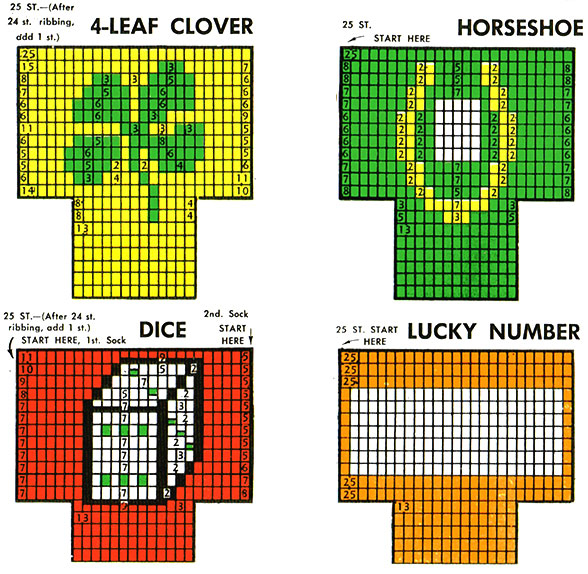
HALF-SQUARES. Please note that certain stitches, as represented by squares in the design of the die, are in fact half-squares which produces finer detail in the pattern. These particular stitches (for example the 9 stitches across top edge of die) are not purled back in the same color they are knit. Instead shift is made to the new color as indicated, when purling.
Note that 2nd sock may be knit to face the opposite way if desired, by starting in upper right corner of graph after completing ribbing. By knitting rows right-to-left and purling each back left-to-right, the other side of your work becomes the finished side. Knit in spots as you wish, to represent dice with favorite numbers in view.
5. USE OF ANGORA. Socks or design may be knit in Angora if desired, but this is not highly recommended since the fuzzy texture is apt to interfere with the clarity of the pattern design on the sock. This design should stand out sharply for best effect. If used, the Angora should be medium weight yarn, otherwise the stitches will be too coarse to be pretty. If the Angora seems to be too heavy, the finer yarn may be obtained by untwisting one ply, then knitting with the part remaining.
6. Note that the numbers given on the Lucky Number design and within the horseshoe on the Horseshoe pattern, cover the stitch count for the colored background area only, not including the areas reserved for numbers or initial. After inserting your own choice of number (or initial) and coloring-in remaining squares with background color, then mark your own stitch count, or count squares while knitting this part.
YOUR OWN CHOICE OF NUMBER (1, 2, or 3 digits) MAY BE PENCILED-IN, IN WHITE AREA OF GRAPH, THEN FILLING IN SQUARES REMAINING WITH BACKGROUND COLOR (AS SHOWN ORANGE).
OTHER DESIGNS. See Pattern 2401 for these other miniature designs: Corn Cob Pipe (Angora smoke ring), Beer Mug (Angora foam), Cocktail Glass, Argyle, Plain sock with initials.
DIRECTIONS
Directions herein are complete including recommended methods for heel and toe. Detailed instructions for beginners on how to knit, purl, etc., cannot readily be given here. These are usually obtainable free, from your yarn shop.
MATERIALS—Somewhat less than ¼ oz. of basic color yarn (possibly 20 yards for most designs) will usually suffice for a pair of these miniature socks. 2 to 5 yards of the individual design colors will be needed. You will probably wish to utilize your left-over scraps of yarn. Socks will be about 4½ inches in overall length, with ½ inch of ribbing, when knit regular method (knitting across and purling back each row, before starting next row) and using No. 1 needles, obtaining a gauge of 10 stitches per inch. For tiniest socks, knit on toothpicks, obtaining 11 stitches per inch. Use regular 3 ply sock yarn.
IMPORTANT (Handling Yarn)—Use needles and yarn in the above accurate sizes in order to have sock of proper size per this pattern. Knitting tension should produce 10 stitches per inch. Use BOBBINS to carry your yarn in small quantities of each color. These will dangle clear of your work, avoiding entanglement. For certain small areas of color involving only a few stitches, you may prefer to merely use SHORT STRANDS of yarn, 12 to 15 inches long, dangling free, instead of bothering to wind separate bobbins. RECOMMENDATION—Make free use of additional bobbins or short strands as new color groups are encountered. A given strand will often be used over again for stitches in the same color group in the following rows, so be sure it is started long enough for the color group it is to handle. CAUTION—It is not desirable to carry one color yarn across the wrong side of another color, to reach stitches of the same color farther along the row. This would save extra strands of yarn, but in so doing the tension variation is likely to cause distortion of the stitches and thus spoil the clarity of the design. In some cases this carry-over of yarn can be accomplished satisfactorily across only one or two stitches of another color, where design detail is not too critical. Some experienced knitters can carry yarn across even more than 2 stitches and avoid a loose loop on inside of sock by twisting the yarn carried with the yarn being worked, but the danger of design distortion must be considered. You will have a more beautiful finished article If separate strands are used freely. The only inconvenience is a few more yarn ends to take care of in finishing inside of sock.
RECOMMENDATION ON BOBBINS FOR THIS PATTERN—Carry your basic color yarn on bobbins. In most cases at least 2 bobbins will be required to cover the background areas separated by the central pattern design. Use short strands for the pattern colors involving only a few stitches. Be careful with knitting tension to keep stitches of uniform size so pattern design will not be distorted.
DICE PATTERN—PURL BACK VARIATIONS. You will note certain stitches representing certain spots on the dice, (and horizontal outline edges), are shown by squares which are divided in half and colored accordingly to form finer detail in the design. These stitches are NOT purled back in same color they are knit. Instead, when purling, use the color as indicated in lower half of square.
RIGHT AND LEFT SOCKS. If you wish, your 2nd sock may be knit so the die faces the opposite way (for symmetrical appearance. Do this by starting in upper right corner and knitting the rows right to left, purling each row back left to right. The opposite side of your work then becomes the finished side. Spots may be changed on the dice to suit your lucky number preference.
LEG PATTERN—This part of sock is knitted in a flat piece, eventually to be folded and sewed together up the back. First cast on 24 stitches of basic color and knit 2, purl 2, for ribbing for ½ inch. Knit the pattern rows as shown on the graph of the particular design selected. Purl each row back to the beginning before starting the next row. Each pattern row thus represents 2 rows of usual knitting. Numbers are shown on graph to indicate stitch count for various groups of stitches. In changing colors always twist yarns around each other once to avoid leaving a hole. Knit the successive rows of the leg part of pattern after which work separates into instep and heel.
INSTEP—Divide the stitches, taking 6 stitches off each end, and place on separate needles or safety pin for the heel. The heel may be knit at this point for those designs where the instep is a plain color. For the 4-Leaf Clover and Horseshoe designs, continue the pattern down the instep, using the center stitches only. When pattern design is complete, down to plain color, then discontinue on his part and knit the heel.
HEEL—Place the 2 groups of stitches previously divided from the instep, on one needle. This folds the main pattern, or leg of sock, into position for sewing up the back later. (The reinforced type of heel should be used, to carry out the exact miniature representation of a real sock.)
Using 12 HEEL STITCHES (all designs ), slip 1, knit 1 in sequence for the 1st row, then purl back. Continue thus in successive rows for ½ inch. On the last purl row, purl 6 stitches, then purl 2 together, purl 1 and turn work. Then:
Knit back 3, knit 2 together, knit 1, turn
Purl back 3, purl 2 together, purl 1, turn
Knit back 3, knit 2 together, knit 1, turn
… etc.
Continue in this manner, advancing 1 stitch at each end of each row in this order and thus making rounded bottom of heel, until all stitches are used, (ending up with 5 stitches on last row. This plan (requiring 7 rows for rounded bottom) lengthens the base of heel slightly and produces a nice curved-down shape to heel of your sock.
Now pick up 6 stitches along each of the 2 forward edges of the heel thus knitted, and add to the work in progress along bottom of heel. Divide all of these heel stitches evenly on 2 needles.
ANKLE and INSTEP (For DICE & LUCKY NUMBER). At this point entire work is on 3 needles,—instep needle with 13 stitches which must be kept separate, and the 2 underfoot (heel) needles on which the stitches along edge of finished heel are evenly divided. Use a 4th working needle and knit plain color foot round and round and form triangular gusset of Ankle by decreasing 1 stitch at the forward point of each underfoot needle on EVERY OTHER ROW until only 6 stitches remain on each underfoot needle. Now decrease to 12 stitches on instep needle). Continue without further decreasing until within ½ inch of desired length of foot.
ANKLE (For 4 LEAF CLOVER & HORSESHOE) Now knit a row purl a row alternately, and decrease one stitch on each side of foot, on each knit row only, to form ankle gusset. When work evens up with instep pattern previously completed, join all work together on 3 needles, keeping the 13 instep stitches on the one needle, other stitches evenly divided on the 2 underfoot needles. Now continue with plain knitting round and round, and also continue to decrease the one stitch on each side of the foot ON EVERY OTHER ROW (on underfoot needles) until only 6 stitches remain on each underfoot needle. Now decrease from 13 to 12 stitches on instep needle, and continue without further decreasing until within ½ inch of desired length of foot.
TOE—Shape toe as follows: Decrease 4 stitches on every other row, these being the end stitches on the instep needle, and the stitches next to these, one on each underfoot needle. When only 8 stitches remain (4 on instep needle and 4 on underfoot needles) then weave toe as follows: Place yarn in a tapestry needle and, with yarn coming from back of knitting needle, put it in first stitch of front (instep) needle as if to knit, and slip it off. Then put it in next stitch of front needle as if to purl and leave it on. Go to back (underfoot) needle and insert as if to purl and take it off, then to next stitch of back needle as if to knit and leave it on. This designation may assist:
Front needle K—off, P—on
Back needle P—off, K—on
Repeat thus to the end of the 4 stitches on each needle.
FINISH—Finish inside of sock by weaving thread ends into nearby seams, trimming ends, etc. Sew sock up back (using corresponding color yarn on a tapestry needle. For 4-Leaf Clover and Horseshoe designs, sew foot of sock up on each side where instep pattern was knitted separately from lower foot in that area. Shape and press finished socks if you wish to display them flat, or stuff with cotton if you prefer them to have a rounded appearance. Attach complete socks together with strands of colored yarn for hanging up in your car or elsewhere for display.
GENERAL DIRECTIONS
Each square equals one stitch, knitted and/or purled. Sequences of stitches in particular colors to form a pattern are shown in color and by numbers on the specific pattern graphs. This saves counting squares. The number of row and number of stitches in each, depend on the symmetry of the pattern design, also on the approximate size of sock desired in order to fit the wearer's leg. Size and dimensions are indicated in each particular pattern.
Each row is normally knitted and purled back in the same colors. For certain patterns which are easily repeated, the knitter may, in purling back, go to the next row. In this case the indicated pattern will be reduced in size by one-half, and the entire pattern must then be repeated in order to achieve the length indicated.
Heel, bottom of foot, and toe are knitted in the manner of plain socks. In certain patterns where the instep is a plain color, and the same color as the foot, this part of the sock may be knitted round and round as in plain socks.

| Pattern Categories Browse the categories to help you find the patterns you're looking for. |
||
|
||


