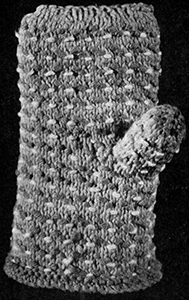
Extra Pair of Hands Oven Mitt Pattern #20

Here's that extra pair of hands that you have often wished for in the kitchen. A pair of these tri color knitted oven mitts can be just that handy when attached to a crocheted cord and worn around the neck like the kindergarten set wear theirs when Mother wishes to guard against lost mittens and cold hands. Or you could attach a metal ring to each mitt and hang it near the stove. Never again will you have ugly burned splotches on the tops of your knuckles from reaching after the last baked potato that lurks back in the far corner of the oven.
MATERIALS REQUIRED—Two 70-yard skeins Lily Rug Yarn, Orange; one 70-yard skein Lily Rug Yarn, Medium Green: one 70-yard skein Lily Rug Yarn, White; 1 pair No. 5 (standard size) double-pointed needles. Best to use Aluminum or steel needles when working with cotton yarn. Cotton Yarn, Art. 600, may be substituted for Rug Yarn.
SIZE: These will fit any size hand, even the Chef of the family.
Cast on 17 sts on each of 3 needles, using Green yarn. Being careful not to twist sts, join and K 1 around. Mark beg. of round to simplify following pattern later. ROW 1—K. ROW 2—P. ROW 3—K. ROW 4—P. ROW 5—Join Orange yarn at back of work, K 1 row, and begin pattern as follows: (Join White yarn at back. Extra colors are carried along loosely on wrong side of work throughout. Be careful not to pull them tight as this can alter the size of the finished mitt.) ROW 6—* K 2 with orange, bring white thread to front of work, slip st as if to P, carry White thread over sl st and back to wrong side again. Repeat from * around. ROW 7—* With Green, sl next stitch as above, K 2 Orange. Repeat from * around. ROW 8—* With Orange, K 1, with Green sl next st, K 1 Orange. Repeat from *. ROW 9—With Orange K all way around. Repeat last 4 rows (Rows 6 thru 9 are one complete pattern) until work measures 3½ inches from last Green row of border. THUMB OPENING—Beg. of next plain Orange row, K 3, cast off 9 sts. Finish row. Next row: Cast on 9 sts above 9 cast off sts, working row in pattern. Continue pattern until work measures 4 inches from thumb opening. Cut Green and White threads and finish in Orange alone. Next row: * K 2, K 2 tog. Repeat from * around. Repeat last row two times more.
FINISHING END OF MITT—Divide remaining sts on two needles, with thumb opening lying flat on under side of mitt. Cut Orange thread leaving 6 inches with which to weave sts tog. and finish off finger end of mitts.
THUMB—Pick up 18 sts at thumb opening, 6 on each needle, beginning with Orange. Join other 2 colors. Follow the 4 pattern rows (6 thru 9) continuing pattern for 2 inches. Working in Green only, * K 2, K 2 tog. Repeat from * around. Continue decreasing in this fashion until 4 sts remain. Pull thread thru sts, draw tog. and fasten off on inside.
FINISHING—Turn mitt inside out and fasten off any loose ends of yarn. Turn half of Green border inside and fasten with tapestry needle using loose sts. This rolled edge at top of mitt makes it easy to slip hand into a mitt.
SECOND MITT—Repeat above directions throughout. When weaving sts at finger end of mitt be sure to place thumb on opposite side to that of first mitt. If desired, mitt may be lined with flannel for extra heat protection.
Platter Pad Pattern
Canasta or Bridge Place Mats Pattern
Petunia Tea Cozy Pattern
Extra Pair of Hands Oven Mitt Pattern
Corn Cob Pot Holder Pattern
Scottie Bib Pattern
Checked for Charm Crocheted Apron Pattern
Daisy Time Table Doily Pattern
Sunflower Table Doily Pattern
Plaid-orable Table Doily Set Pattern
Modern American Breakfast Nook Rug Pattern
Coaster Cups Pattern
Flower Coaster Set Pattern
Nut Cup Pattern
Dahlia Hot Plate Mat Pattern
Party Accent Napkin Holder Cover Pattern
Kitchen Corner Crocheted Ball Trim and Tie Back Pattern
Hand-in-Glove Pincushion Pattern
Cherry Whirl Pot Holder Pattern
Pine Cone Pot Holder Pattern
Kettle Black Pot Holder Pattern
Fluff Fringe Curtain Trim Pattern
| Pattern Categories Browse the categories to help you find the patterns you're looking for. |
||
|
||


