
     
|
|
|
Newly Added Knit Patterns
College Hand Knits for Men and Women | Botany Volume II

College Hand Knits for Men and Women
Volume II
Botany Yarns, Inc
Original Copyright 1958
| ENTIRE DIGITALLY RESTORED LEAFLET IN .pdf FORMAT AVAILABLE FOR PURCHASE |
 |
Patterns Included:
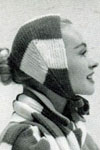
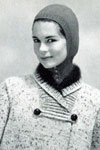
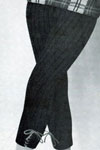
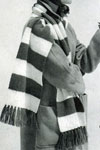
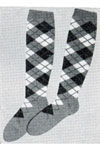
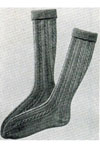
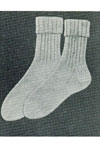
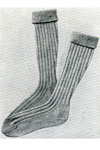
Dickey, two Headbands, Hood, Jumper, Leotards, Men's & Women's Cardigan, four Men's & Women's Pullover, Scarf, Skirt, Slippers, four Socks, six Women's Cardigan, Women's Coat, seven Women's Pullover. A SMART GIRL'S GUIDE TO HAND KNIT
This book will guide you to all the very newest hand knits to wear on and off campus! Carcoats, cardigans, pullovers, dickies, and lots more for the entire campus crowd. And you can knit them all so quickly with the clear "knitting made easy" instructions in this book.
Helpful Information
stitch gauge - Important - Knitted garments are planned on the basis of working to a specified number of stitches and rows to 1 inch; this is referred to as the GAUGE. Required gauge is given at beginning of instructions. If this gauge is not obtained the finished garment will not be the correct size. The size needles recommended will give the average knitter the correct gauge. However, if you do not obtain the gauge required, change the size needles to conform to the tension of your individual knitting; if your knitting is too loose use smaller size needles to tighten gauge; if your knitting is too tight, use larger size needles to loosen gauge. You MUST get gauge given to insure proper size of finished garment.
measurements of garments - The sizes of garments in this book are based on the actual body measurements given below. In the instructions an allowance has been made over the actual body measurements to give sufficient ease and insure correct fit. This allowance varies according to the style of garment, stitch, type of yarn and gauge of knitting. To determine which size garment you should make, take your own accurate body measurements. Then use instructions for size with body measurements nearest to your own body measurements. If adjustment is necessary be sure to allow the same number of inches over actual body measurements as allowed on garment you intend to make. See body measurement charts below.
| women's body measurements | ||||||||
| Sizes |
12
|
14
|
16
|
18
|
20
|
40
|
42
|
44
|
|
|
(32)
|
(34)
|
(36)
|
(38)
|
|
|
|
|
| Bust |
30 ins.
|
32 ins.
|
34 ins.
|
36 ins.
|
38 ins.
|
40 ins.
|
42 ins.
|
44 ins.
|
| Waist |
25 ins.
|
26½ ins.
|
28 ins.
|
30 ins.
|
32 ins.
|
34 ins.
|
36 ins.
|
38 ins.
|
| Hip (7 ins. below waist) |
33 ins.
|
35 ins.
|
37 ins.
|
39 ins.
|
41 ins.
|
43 ins.
|
45 ins.
|
47 ins.
|
| men's body measurements |
|
|
|
|||||
| Sizes |
36
|
38
|
40
|
42
|
44
|
|
|
|
| Chest |
36 ins.
|
38 ins.
|
40 ins.
|
42 ins.
|
44 ins.
|
|
|
|
complete abbreviations
| knit | k |
| purl | p |
| inch(es) | in.(s) |
| together | tog. |
| yarn over | yo |
| stitch(es) | st(s) |
| beginning | beg. |
| increase(s) | inc.(s) |
| decrease(s) | dec.(s) |
| pattern(s) | pat.(s) |
| chain | ch |
| single crochet | sc |
| double crochet | dc |
markers - Make a small loop of contrasting color yarn and place on needle at point or points indicated in instructions. Slip loop from left to right needle without knitting.
blocking or steaming - To give a more tailored finish to knitted or crocheted garments it is preferable to block each piece separately. Care should be taken to block pieces to knitted shape. If the garment is sewn together first and blocked carefully after assembling, the result will also be satisfactory.
to block separate pieces - Lay pieces flat on pressing board, wrong side up, pin edges to board. Steam well with moderately hot iron over a wet cloth, taking care not to let weight of iron rest upon any one spot. After blocking leave pinned until thoroughly dry. Do not steam ribbing.
to block finished garment - Lay flat on pressing board, wrong side out. Steam first one side and when dry, steam other side.
After blocking leave pinned until thoroughly dry, then steam all seams and crocheted edges. Do not steam ribbing.
to block skirts - Pin to board as above and block. When thoroughly dry, remove from board. Pin and block other half. Steam out creases.
casing for elastic for skirts - Holding wrong side of skirt toward you, join yarn on top edge of skirt, ch 5, skip 1 st, 1 slip st in next st at left in 6th row below, ch 5, skip 1 st, 1 slip st at top of skirt in 4th st at left of first st, ch 5, continue in this way around top of skirt, join with slip st in first st; ch 1, turn, 1 sc in each st around top of skirt; join. Fasten off. Insert elastic.
beading for elastic for skirts - Holding right side of skirt toward you, join yarn on top edge of skirt, ch 5; skip 1 st, 1 tr in next st, ch 1, skip 1 st, 1 tr in next st; continue in this way around top of skirt, join with slip st in top of ch; ch 1, do not turn, 1 sc in each st around top of skirt; join. Fasten off. Insert elastic.
WEAVING STOCKINETTE STITCH - Thread a tapestry needle and bring pieces to be joined close together. Draw up yarn in first st on upper piece, inserting needle from wrong side; insert needle from right side in first st on lower piece and bring up through next st from wrong side -draw up yarn; * insert needle from right side in same st as before on upper piece and bring up through next st from wrong side - draw up yarn; insert needle from right side in same st as before on lower piece and bring up through next st-draw up yarn; repeat from * until all sts are joined, and fasten yarn well before breaking off.
WEAVING TOE - Thread end of yarn into tapestry needle and weave sts together as follows: * Pass needle through first st of front needle as if to k and slip st off, pass through 2nd st of front needle as if to p but leave st on needle, draw yarn through, pass needle through first st of back needle as if to p, slip st off, pass through 2nd st of back needle as if to k, leave st on needle, draw yarn through; repeat from * until all sts are joined. Fasten off.
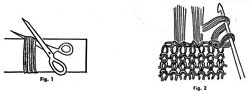
FRINGE - Wind yarn around cardboard; cut at one end, see Figure 1. Fold in half and knot in number of strands indicated in individual instruction, see Figure 2. Trim fringe evenly.

Knitting Patterns:
 |
 |
 |
 |
 |
 |
 |
 |
 |
 |
 |
 |
 |
 |
 |
 |
 |
 |
 |
 |
 |
 |
 |
 |
 |
 |
 |
 |
 |
 |
 |
 |
|||
| Pattern Categories Browse the categories to help you find the patterns you're looking for. |
||
|
||

|


