Cap & Mittens Patterns
MATERIALS
BERNAT Meadowspun (1 oz. pull skeins) — 1 each Main Color (M C); Colors A and B
1 pair each straight knitting needles Nos. 1, 2 and 3 OR ANY SIZE NEEDLES WHICH WILL GIVE THE STITCH GAUGE GIVEN BELOW
Bobbins
Elastic thread
GAUGE: 8 sts = 1 inch; 12 rows = 1 inch
CAP
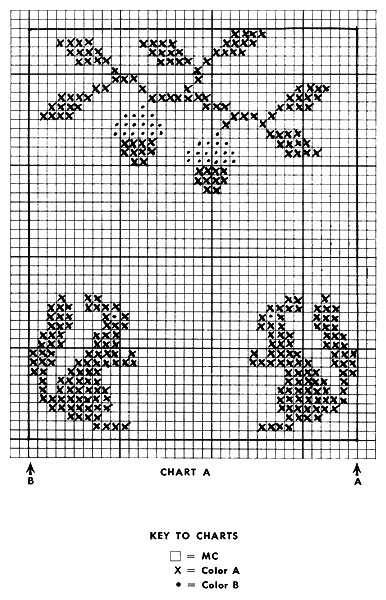
FRONT PIECE: Using No. 2 needles and M C, cast on 72 sts. Working in BACK LOOP of K st, K 1, P 1 in ribbing for 1 inch. Work even in stockinette st for ¾ inch, ending with a P row. On next row K 18, put a marker on needle, following Chart A, work design in stockinette st on next 36 sts, put a marker on needle, K to end of row Following Chart A for design on 36 sts between markers, continue in stockinette st until 14 rows of chart have been completed SHAPE TOP: Still following Chart A, on next row K 1, sl 1, K 1, psso, work to last 3 sts, K 2 tog, K 1 Continue in this manner to dec 2 sts in a row every other row until chart has been completed. Break off Colors A and B and continue to dec 2 sts in a row in same manner as before until 4 sts remain. Bind off.
BACK PIECE: Work to correspond to front piece.
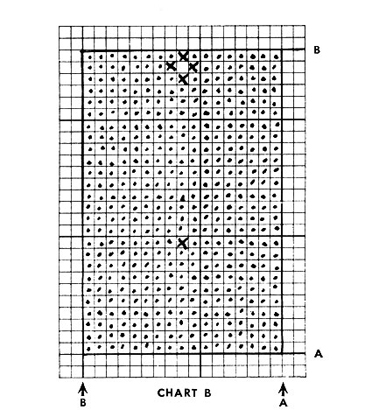
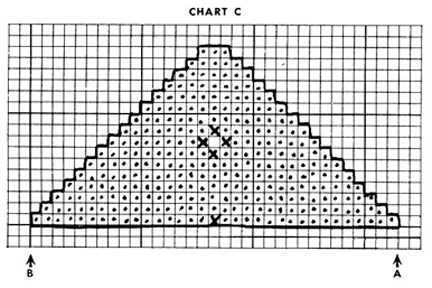
TIES AND SIDE PIECES: Using No. 2 needles and Color B, cast on 17 sts. Following Chart B, work in stockinette st until piece measures 20 inches, ending with a P row. Sl sts onto a holder. Make another piece in same manner. Sl both pieces onto one needle. On next row K 16, K 2 tog, K 16 — 33 sts. Work in stockinette st for 5 rows more. Following Chart C, continue in stockinette st, dec 1 st each end of needle EVERY ROW until 3 sts remain. Bind off.
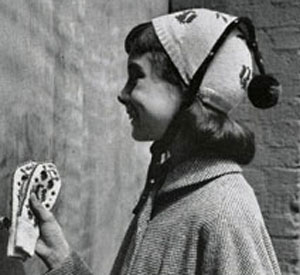
FINISHING:Sew front and back pieces tog. Fold side pieces lengthwise and sew edges tog. Sew to cap as shown in photograph, leaving ends free for ties. Block. Using Colors A and B, make a pompon and sew to top of cap. Weave elastic thread through first 4 rows of ribbing on back piece.
MITTENS
NOTE: For small size, use No. 1 needles; for medium size use No. 2 needles and for large size use No. 3 needles.
GAUGE: 17 sts = 2 inches on No. 1 needles; 8 sts = 1 inch on No. 2 needles; 7 sts = 1 inch on No. 3 needles
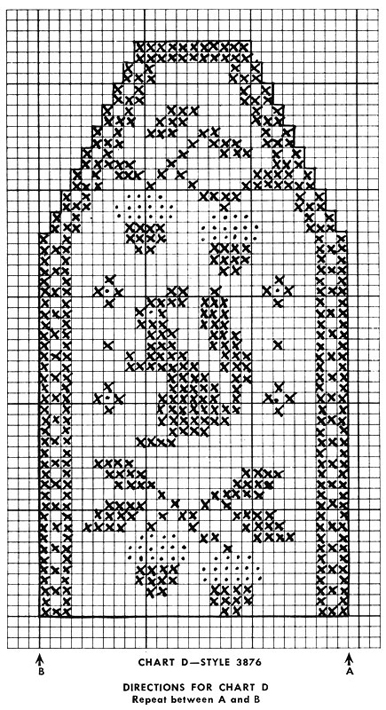
BACK OF HAND PIECES: Make 2. Using M C, cast on 26 sts. K 1, P 1 in ribbing for 1½(2-2½) inches. P 1 row, inc at even intervals to 29 sts. Work even in stockinette st for 4 rows more. Then, following Chart D, work design in stockinette st until 36 rows of chart have been completed. SHAPE TOP: Still following Chart D, dec 1 st each end of needle as follows: Work 3 sts, sl 1, K 1, psso, work to last 5 sts, K 2 tog, work last 3 sts. Repeat this dec every other row 8 times more. Bind off.
LEFT PALM: Using M C only, work to correspond to back piece, omitting design, until piece measures 1½(1¾-2) inches above ribbing, ending with a P row. THUMB: Using a piece of contrasting color yarn, K the next 9 sts to mark placing of thumb, sl the 9 sts just worked back on left-hand needle and using yarn with which you have been working, K these same 9 sts, K to end of row. Continuing in stockinette st, work to correspond to back piece to shaping of top. SHAPE TOP: K 1, sl 1, K 1, psso, K to last 3 sts, K 2 tog, K 1. Repeat this dec every other row 8 times more. Bind off. THUMB: Pull out colored yarn. Using M C, with right side facing you, pick up and K sts around opening, inc 1 st in corner and cast on 1 st at end of row — 19 sts. Work even in stockinette st until desired finished length. On next row work 1 st, work 2 sts tog across row. Break off, leaving an end. Draw end through all sts on needle and fasten tightly. Sew seam.
RIGHT PALM: Work to correspond to left palm, reversing placing of thumb.
FINISHING: Sew palm and back piece tog. Block.
Pullover Sweater Pattern 5900
Pullover Sweater Pattern 5921
Cardigan Sweater Pattern 5929
Pullover Sweater Pattern 5928
Pullover Sweater Pattern 5930
Cardigan Sweater Pattern 5911
Pullover Sweater Pattern 5899
Pullover Sweater Pattern 5896
Pullover Sweater Pattern 5925
Cardigan Sweater Pattern 5904
Cardigan Sweater Pattern 5923
Cardigan Sweater Pattern 5895
Pullover Sweater Pattern 5922
Pullover Sweater Pattern 5903
Hooded Cardigan Sweater Pattern 5898
Hooded Cardigan Sweater Pattern 5920
Hooded Cardigan Sweater & Mittens Patterns
Hooded Pullover Sweater Pattern 5912
Pullover Sweater Pattern 5892
Sweater, Mittens & Ear Warmer Patterns
Pullover Sweater Pattern 5926
Pullover Sweater Pattern 5891
Cardigan Sweater Pattern 5913
Bolero Pattern
Cape Pattern
Coat Pattern
Cardigan Sweater Pattern 5910
Cardigan Sweater Pattern 5901
Pullover Sweater Pattern 5919
Pullover Sweater Pattern 5894
Classic Cardigan Sweater Pattern
Classic Pullover Sweater Pattern
Pullover Sweater Pattern 5927
Hat Pattern 3911
Cap Pattern 3901
Hat Pattern 3910
Hat Pattern 3879
Hat & Miser Purse Patterns
Helmet Pattern
Cap & Mittens Patterns
Pullover Sweater Pattern 5908
Slippers Pattern
Knee Socks Pattern
Ankle Socks Pattern
Winter Doll Clothes Pattern
| Pattern Categories Browse the categories to help you find the patterns you're looking for. |
||
|
||


