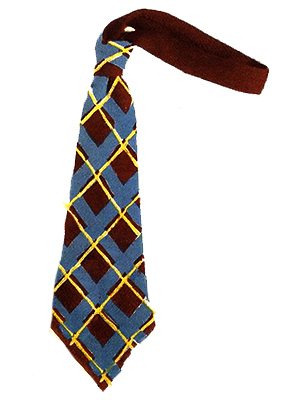
3-Color Plaid Necktie Pattern #5014T

MATERIALS—Approximate yarn quantities: 1 oz. (at least 200 yards) basic color—light brown, 1 oz. blue, ⅛ oz. yellow. These quantities apply where the pattern is knitted only on the wide end of the tie as shown. If desired the pattern may be repeated and carried throughout the tie, in which case somewhat more of the stripe colors will be required.
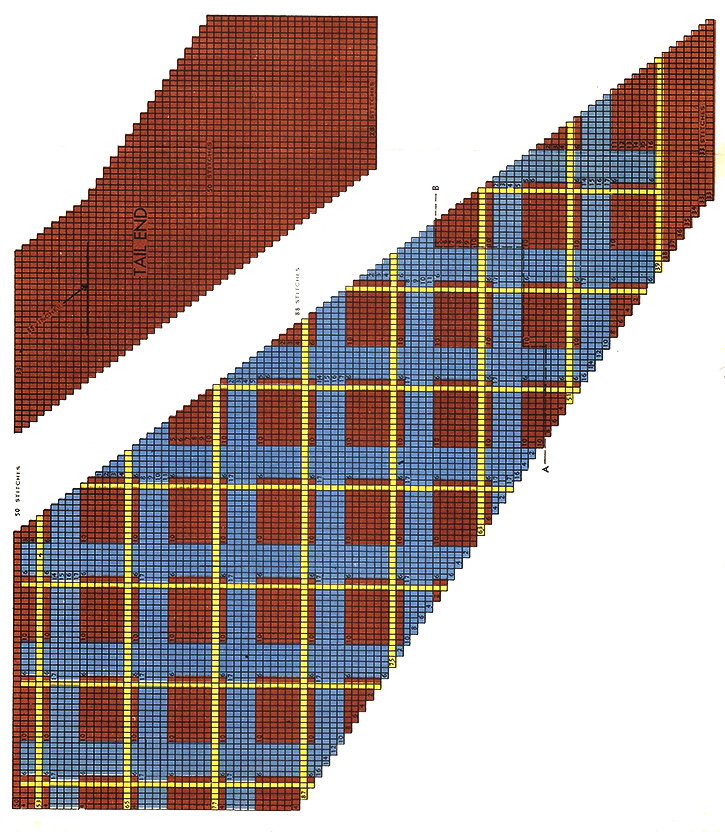
Knit pattern as shown in order to include knot in pattern when tied. If desired the pattern may be discontinued in favor of plain color beyond line A—B, in which case the knot will show in plain basic color. The tail end of the tie may be knitted in one of the stripe colors if you wish.
We suggest using 3-ply sport yarn or sock yarn for a casual or sport tie as shown in the picture. Where a more dressy tie is desired use a firm-twist, smooth, glossy dress-type yarn. A combination wool- rayon type yarn is very suitable. In any case use size No. 1 needles.
IMPORTANT: Use these materials and needles in the sizes indicated, in order to achieve the proper size tie in accordance with the pattern.
In doing the pattern design it is well to carry your yarn in small quantities of each color, on bobbins which dangle conveniently clear of your work, avoiding entanglement, except that the vertical yellow stripes may be handled in short strands about 18 or 20 inches long. Thus you needs 3 strands of yellow and 7 bobbins at first for the 10 colors, occurring in separated groups as follows for the first pattern row: light brown, yellow, blue, light brown, yellow, blue, light brown, yellow, blue, light brown. Use one bobbin only, to knit the series of light brown stitches which are interrupted only by the single stitches in the yellow stripe. Simply carry the yarn across the wrong side of the interrupting yellow stitch. Ultimately 10 bobbins, plus short strands, will be required as pattern progresses.
PATTERN—You will note the tie is knitted on the bias, so that it will not stretch appreciably and lose its shape. The tie is knitted in one flat piece which is then to be folded, and edges sewed together up the back. The successive pattern rows are knitted in order from left to right and each is purled back. First cast on 50 stitches of basic color light brown, as the first row and purl back to the beginning. Now commence the pattern on row 2, knitting as shown in the graph, that is 4 stitches of light brown, 1 yellow, 1 lt. brown, 6 blue, 10 brown, 1 yellow, 1 lt. brown, 6 blue, 10 lt. brown, 1 yellow, 1 lt. brown, 6 blue, 3 lt. brown. These numbers are shown on the graph to save counting squares. In changing colors always twist yarn around each other once to avoid leaving a hole. The total number of stitches now becomes 51, one stitch being added by increasing one at the end of the knit row. Now turn and purl back, ON THIS SAME ROW, using the same colors in the same places. Knit the next row in the indicated color sequences, which in this case are the same as before, and again add a stitch at the end, thus knitting 4 light brown as the final sequence. Purl back. Continue thus following the pattern, until you complete row No. 39 when you should have 88 stitches on the needle. From this point on, you begin forming the lower edge of the pattern, and you will note that each row loses 2 stitches at this end compared to the previous row. This decreasing is done by knitting 2 stitches together when starting the row and purling 2 stitches together at the completion of the purl row. Thus the number of stitches knitted in the first sequence of each row is actually one more than the number indicated by the figures. When purling back, the number of stitches to be purled in the same sequence (including the last two stitches purled together as one stitch) will equal this indicated number. Continue knitting successive rows in this manner and following the pattern until 33 stitches remain on the needle.
NECKBAND—With 33 stitches on the needle continue to knit successive rows and maintain this number of stitches by decreasing 1 stitch at the beginning of each knit row, and increasing 1 stitch at the end of each knit row. Purl back each row direct. Continue thus, making the neckband and narrow end of the tie until the work measures 35 inches long down the center. This point is indicated on the separate graph showing the tail end of the tie.
TAIL FLARE—On the next successive rows continue to decrease 1 stitch at the beginning of each knit row (as before), and increase 2 stitches at the end of each knit row, until there are 50 stitches on the needle. Now omit increases at the end of the knit rows. (Continue to decrease at the beginning of each knit row only) until 28 stitches remain.
FINISH—Bind off loosely. Finish wrong side of tie by weaving thread ends into nearby seams, knotting loose ends, trimming, etc. Steam press entire work flat first, then fold lengthwise and sew edges together using a strand of the basic color yarn and a tapestry needle. Finish press. (It is not necessary to sew a lining in this tie).
GENERAL DIRECTIONS
TIE is knitted on the bias, the shape being established by systematic increasing or decreasing of stitches on each row as shown in the graph. Each square equals one stitch knitted and/or purled. Sequences of stitches in particular colors to form a pattern are shown in color and by numbers on the specific pattern graphs. This saves counting squares.
The number of stitches to start, and the system of decreasing and increasing on respective ends of the successive rows to produce the bias arrangement, are subject to variation at the discretion of the individual knitter desired width and shape of the resulting necktie. The chart shown depicts average conditions for normal knitting tension, using No. 1 needles, and average size yarn knitting about 10 stitches to the inch, and 8 rows to the inch (where a row, as on the chart equals a knitted and purled back sequence). The resulting tie then corresponds in size and shape to the average four-in-hand necktie in common use. Where the above conditions of tension and yarn size tend to vary slightly, the final result will not be seriously affected if the chart is followed as shown, since the final size of the tie may be adjusted somewhat in finish sewing by sewing edges together loosely (to increase the width), or overlapping the edges slightly (to make tie narrower).

| Pattern Categories Browse the categories to help you find the patterns you're looking for. |
||
|
||


