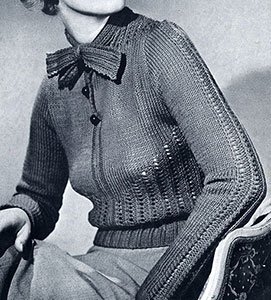
Happy Days Pullover Pattern #1043

Size 34
Materials: Chadwick's Red Heart Germantown, 9 balls (1 ounce balls). Milward's Casein knitting pins, 1 pair No. 7 (4¾ mm. size). 3 buttons.
Gauge: 5 sts make 1 inch; 7 rows make 1 inch.
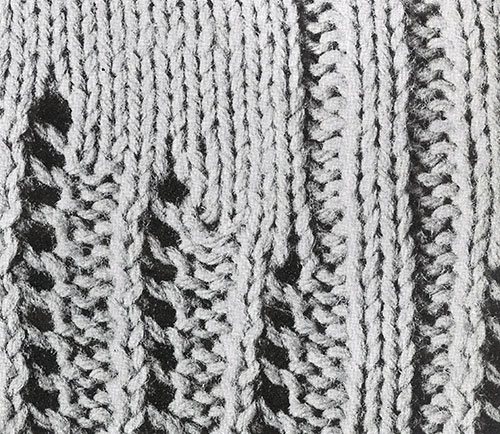
Back. Starting at bottom of waistband, cast on 72 sts and work in ribbing of k 2, p 2, for 3 inches, increasing 2 sts at the end of the last row (74 sts). Then work in lace pattern as follows: 1st row: * P 2, then keeping yarn in front of needle as if to p, k next 2 sts together (thus a yarn over is made). Repeat from * across, ending row with p 2. 2nd row: * K 2, p 2. Repeat from * to end of row. These last 2 rows constitute the lace pattern. Repeat these 2 rows alternately, until work measures 2 inches from top of waistband, ending with the 2nd row. Next row: (You are now facing the right side of work.) Work in lace pattern across first 34 sts, then k 6, and continue in lace pattern across remaining 34 sts. Next row: Work in lace pattern across first 34 sts, p 6, and continue in lace pattern to end of row. Repeat these last 2 rows once more. Then on the next row, work in lace pattern across the first 30 sts, k 14, and continue in lace pattern across remaining 30 sts. Next row: Work in pattern across to within 14 k sts, p 14, and continue in pattern to end of row. Repeat the last 2 rows once more. Continue in this manner, changing 4 sts of lace pattern into stockinette st at both sides of stockinette st section at center on every 5th row, until all sts are in stockinette st. Hereafter continue to work in stockinette st (k 1 row, p 1 row), increasing 1 st at both ends of 1 row every inch twice (78 sts). Then work straight until work measures 8½ inches from top of waistband.
To Shape Armholes: Bind off 5 sts at the beginning of each of next 2 rows. Then decrease 1 st at both ends of every other row 4 times (60 sts). Work straight until work measures 6 inches from 1st row of armhole shaping. Then, to shape shoulders, bind off 3 sts at beginning of each row, until 24 sts remain. Bind off remaining sts for back of neck.
Front. Cast on 84 sts and work as for back to armhole shaping (86 sts), except, for the lace pattern after the ribbing, continue working the center 6 sts in ribbing of p 2, k 2, p 2 (thus having the center k 2 rib come on right side of work). Shape armhole as for back until 68 sts remain. Then on next p row, p 31, k 2, p 2, k 3, turn (thus starting front opening). For right front, work back and forth over these 38 sts, making a buttonhole 3 sts in from center front edge on next row and every 1¾ inches thereafter. (To make a buttonhole, on one row bind off 2 sts, and on next row cast on 2 sts to replace those bound off.) When 3 buttonholes are made, work 2 more rows. To shape neck, bind off 5 sts at neck edge, then work in lace pattern to end of row. Hereafter work in lace pattern only, decreasing 1 st at neck edge every row until 22 sts remain. Now work in ribbing of k 2, p 2, until armhole measures same as armhole of back. Then shape shoulder as for back, keeping neck edge straight. Break off. With wrong side of work toward you, pick up 7 sts in back of rib sts at center front, then p across remaining 30 sts. Work to correspond with opposite side omitting buttonholes and working in stockinette st only.
Sleeves. Starting at wrist, cast on 36 sts. Work entire sleeve in stockinette st, except the center 8 sts which are worked in lace pattern. When sleeve measures 3 inches, increase 1 st at both ends of next row and every inch thereafter until there are 62 sts on needle. Then work straight until sleeve measures 17 inches. To shape top of sleeve, decrease 1 st at both ends of each row until 54 sts remain. Then decrease 1 st at end of each row until 20 sts remain. Now decrease 1 st at both ends of each row until 12 sts remain. Bind off.
Neck Band and Tie. Cast on 12 sts. 1st row: P 3, k 2, p 2, k 2, p 3. 2nd row: K 3, p 2, k 2, p 2, k 3. Repeat these 2 rows alternately until work measures about 33 inches. Bind off.
After pieces have been blocked, sew up underarm and shoulder seams. Sew up sleeve seams and sew sleeves in. Sew one edge of neck band along neck edge, sewing to within 1 inch on each side of front opening. Sew on buttons to correspond with buttonholes.

Promenade Dress Pattern
Tailleur Dress Pattern
Happy Days Pullover Pattern
Shirtmaker Dress Pattern
Linesman Dress Pattern
Golfer Cardigan Pattern
Symphony Dress Pattern
Little Miss Jacket Pattern
Tee-Off Pullover Pattern
Woodland Dress Pattern
Wildemere Dress Pattern
Smocked Twins Set Pattern
Epaulette Dress Pattern
Wee One Baby Set Pattern
Criss Cross Afghan Pattern
| Pattern Categories Browse the categories to help you find the patterns you're looking for. |
||
|
||


