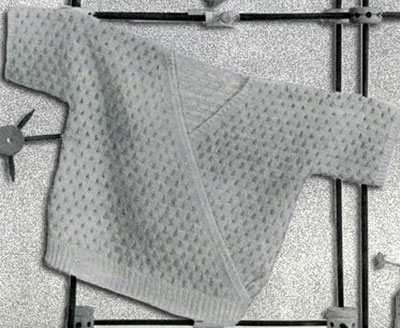
Surplice Sweater Pattern

Directions are for 6-month size. Changes for 1-year size are in parentheses.
MATERIALS:
NOMOTTA Non-Shrink Mothproof Baby Wool or Pompadour
2 1-oz balls Main Color (MC)
1 1-oz ball Contrasting Color (CC)
1 pair needles size 2
4 small pearl buttons
GAUGE: 8 sts = 1 inch; 12 rows = 1 inch
PATTERN STITCH: On a multiple of 4 stitches plus 3.
ROW 1: (right side) With MC, knit across.
ROW 2: Purl across.
ROW 3: With MC, K 3; *K 1 CC, K 3 MC; repeat from * across.
ROW 4: With MC, P 3, *K 1 CC, P 3 MC; repeat from * across.
ROWS 5 AND 6: Same as Rows 1 and 2.
ROW 7: With MC, K 1; K 1 CC, *K 3 MC, K 1 CC; repeat from * end with K 1 MC.
ROW 8: Purl the MC and knit the CC.
Repeat these 8 rows for Pattern.
BACK: With MC, cast on 87 (91) sts. Work firmly in ribbing of K 1, P 1 for 1 inch. Change to Pattern and work straight until back measures 6 ins from start, end with a pattern row. Place a marker at each end to indicate start of sleeves.
SLEEVES: With MC, cast on 26 sts at end of next 2 rows; 139 (143) sts. Keeping 3 sts at each end in Garter-st (K every row) for borders, continue in pattern until sleeve edge measures 3 (3¼) ins (measure from inside border), end on wrong side. Next row: Work across 56 (57) sts in Pattern, knit next 27 (29) sts, work in Pattern to end of row. Working the center 27 (29) sts in Garter-st until there are 3 ridges (6 rows) work across center sts, end on wrong side. Next Row work across 59 (60) sts, slip these sts on a holder or to end of needle for sleeve and Right Front. Bind off firmly next 21 (23) sts for back of neck, work in Pattern to end of row. Place a marker in center of last row to indicate end of shoulder.
LEFT FRONT: Keeping 3 sts at each end in Garter-st, continue in pattern increasing 1 stitch inside front border every other row until there are 5 rows more in front sleeve than in back sleeve (extra rows are for shoulder). Bind off 26 sts at sleeve edge. Keeping 3 sts at front edge in Garter-st, continue to increase 1 stitch inside border every other row until there are the same number of rows in front from end of sleeve as there are in back. Work firmly in ribbing of K l, P 1 same as back. Bind off in ribbing.
RIGHT FRONT: Work to correspond with Left Front reversing shaping.
FINISHING: Press lightly and sew seams. Make 2 small buttonloops at waistband-edges. Sew buttons on each side—2 on outside and 2 on inside.
Baby Set in Quaker Stitch Pattern
Baby Sacque and Shoes Pattern
Two Color Baby Jacket and Bonnet Pattern
Raglan Shirt for Baby Pattern
Surplice Sweater Pattern
Lap Over Shirt and Soakers Pattern
Romper for Baby Pattern
Playsuit with Jacket Pattern
Cardigan with Borders Pattern
Cardigan with Tulips Pattern
Twin Sweater Set Pattern
Slip On with Ribbed Yoke Pattern
Lace Trimmed Cardigan Pattern
Coat and Bonnet Pattern
Knitted Tweed Coat and Cap Pattern
Blazer for Girl or Boy Pattern
Striped Blazer Pattern
Helmet with Mittens Pattern
Beret Pattern
Jacket with Hood Pattern
Two Piece Snow Suit with Cap and Mittens Pattern
Knitted Carriage Robe Pattern
| Pattern Categories Browse the categories to help you find the patterns you're looking for. |
||
|
||


